
29 coaches online • Server time: 08:16
* * * Did you know? The best rusher is debog with 8789 rushing yards.
| Recent Forum Topics |


2025-03-21 20:18:01
3 votes, rating 6
3 votes, rating 6
Vampire 2 turn scoring
Initial setup:
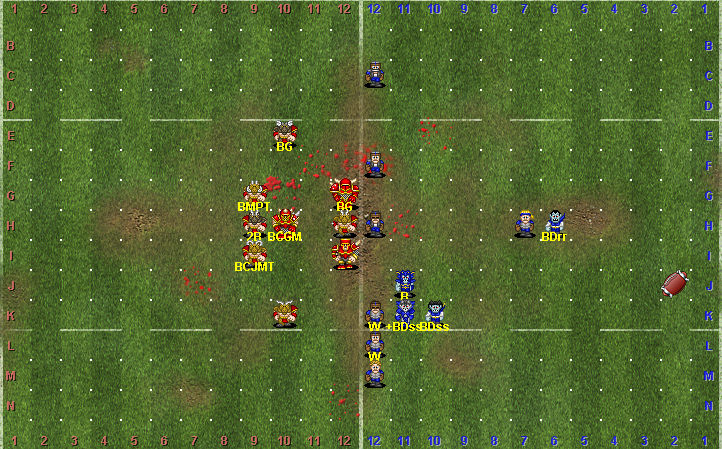
- The Chaos team is in a compact central setup, this makes things easier
- The Thrower at the back has a Thrall with him incase he fails Bloodlust, and for cover
- The opponents on the LOS are all marked by Thralls, so they can't move if there's Solid Defence or Blitz! kickoff events. It does put the Thralls in more danger though
- The other Vampires are not blitz-able
- There's 3x Thralls on the LOS in front of the Runner that are able to push forward 6 squares, which means next turn hopefully they'll be able to reach the squares next to the endzone. This means the carrier can still bite them and score if Bloodlust is failed
- There's no gaps that can be walked through, as there's the line of Thralls across the middle of the pitch
After the first turn - Pushed down the flank and successfully made the pickup
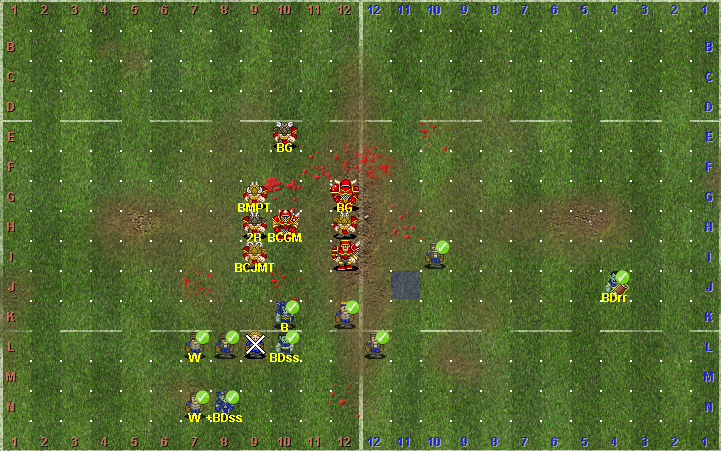
- The Runner is in scoring position on the south flank, and can't easily be attacked
- The Thrower has the ball, and can't easily be attacked (but actually is in range to be marked by a Beastman)
- The ball landed close enough to the Thrower that he would be able to reach back to his escort Thrall if he failed Bloodlust, so that Thrall didn't need to move first, instead stayed unactivated while the Thrower did the pickup, and can instead do something more useful further forward
- The Thralls with 'W' moved forward 6 squares unopposed, and are now in range of the endzone. They're providing the forward part of the Runner's screen
- The isolated Thrall that was north, has moved central to aid the screen, such that Chaos won't be able to get into the path of the upcoming pass.
- Pushing that Thrall forward 6 squares on the north flank would also have been an option, as a distraction / alternate scoring threat
- The south Beastman has been blitzed and removed, but also moving the Blitzer and Thrower has stunned one of the Thralls
- Thralls should move before Vampires, where possible
- Last actions of the turn was dodging the Thralls out of contact on the LOS, just to avoid giving away blocks, and to reinforce the screen. Not essential, and sometimes it'll be better to keep the LOS marked and suffer the blocks
After Opponent's reaction:
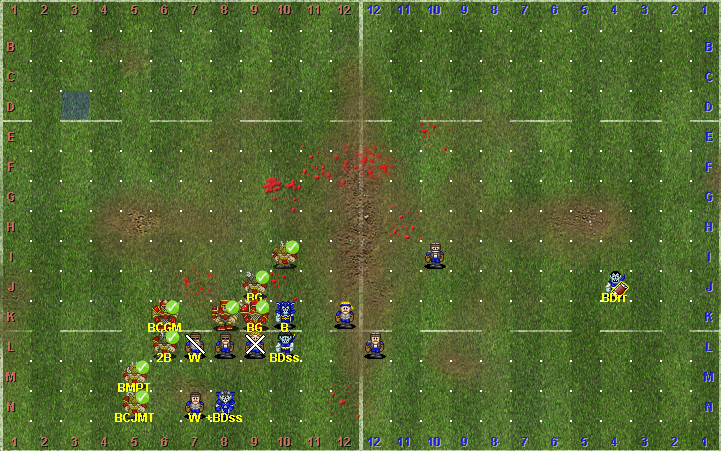
- Opponent has blitzed the Thrall at the front corner of the screen, obstructed the path, and generally gone into heavy contact
- There's 2 Tackle Beastmen directly in the way of the Runner, and there's no appealing diagonal route available, so going directly forwards is the only real option
- Key players remain unmarked: The Thrower with the ball, the Runner, and 4 Thralls
After the scoring turn:
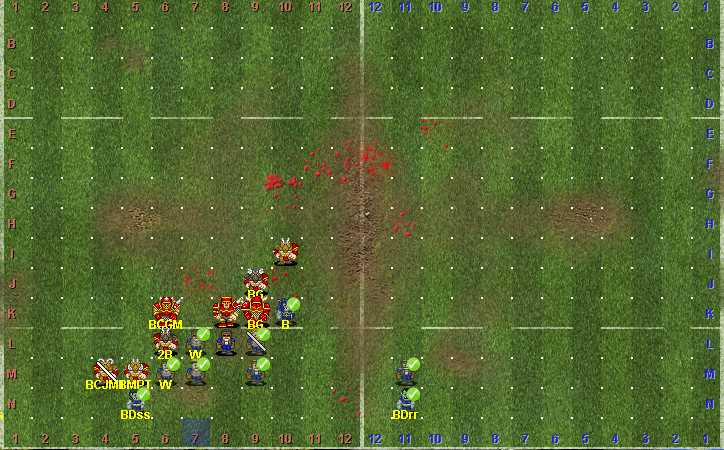
- Need to clear the Beastmen out the way, Pass the ball, then score. There's a few ways to approach this, including Gazing them
- Count the squares for the Pass, including potential Rushes. There should be a Thrall in position for the Thrower if he needs to bite
- Try and move a Thrall adjacent to the Endzone for the Runner to bite if needed. (Didn't happen in this example)
The actual steps taken to score in this example were:
- Stand up the prone Thrall
- Move a free Thrall next to where the Thrower will Pass from
- Attempt to free the 'BDss' Thrower by Gazing the 'BG' Blocker with the 'B' Blitzer. It's Bloodlust 3+ but there's a Stunned Thrall available if failed, so it can't cause a turnover
- The Gaze fails, so that Thrower is going to have to dodge if he wants to move
- Step the 'W' Thrall forward 1 square, into contact with the Beastmen, to assist the Thrower's blitz
- Dodge and Blitz with the Thrower to clear the south Beastman out the way
- Pass
- Run it in with Runner for the touchdown (off-screen to the left)
- The Chaos team is in a compact central setup, this makes things easier
- The Thrower at the back has a Thrall with him incase he fails Bloodlust, and for cover
- The opponents on the LOS are all marked by Thralls, so they can't move if there's Solid Defence or Blitz! kickoff events. It does put the Thralls in more danger though
- The other Vampires are not blitz-able
- There's 3x Thralls on the LOS in front of the Runner that are able to push forward 6 squares, which means next turn hopefully they'll be able to reach the squares next to the endzone. This means the carrier can still bite them and score if Bloodlust is failed
- There's no gaps that can be walked through, as there's the line of Thralls across the middle of the pitch
After the first turn - Pushed down the flank and successfully made the pickup
- The Runner is in scoring position on the south flank, and can't easily be attacked
- The Thrower has the ball, and can't easily be attacked (but actually is in range to be marked by a Beastman)
- The ball landed close enough to the Thrower that he would be able to reach back to his escort Thrall if he failed Bloodlust, so that Thrall didn't need to move first, instead stayed unactivated while the Thrower did the pickup, and can instead do something more useful further forward
- The Thralls with 'W' moved forward 6 squares unopposed, and are now in range of the endzone. They're providing the forward part of the Runner's screen
- The isolated Thrall that was north, has moved central to aid the screen, such that Chaos won't be able to get into the path of the upcoming pass.
- Pushing that Thrall forward 6 squares on the north flank would also have been an option, as a distraction / alternate scoring threat
- The south Beastman has been blitzed and removed, but also moving the Blitzer and Thrower has stunned one of the Thralls
- Thralls should move before Vampires, where possible
- Last actions of the turn was dodging the Thralls out of contact on the LOS, just to avoid giving away blocks, and to reinforce the screen. Not essential, and sometimes it'll be better to keep the LOS marked and suffer the blocks
After Opponent's reaction:
- Opponent has blitzed the Thrall at the front corner of the screen, obstructed the path, and generally gone into heavy contact
- There's 2 Tackle Beastmen directly in the way of the Runner, and there's no appealing diagonal route available, so going directly forwards is the only real option
- Key players remain unmarked: The Thrower with the ball, the Runner, and 4 Thralls
After the scoring turn:
- Need to clear the Beastmen out the way, Pass the ball, then score. There's a few ways to approach this, including Gazing them
- Count the squares for the Pass, including potential Rushes. There should be a Thrall in position for the Thrower if he needs to bite
- Try and move a Thrall adjacent to the Endzone for the Runner to bite if needed. (Didn't happen in this example)
The actual steps taken to score in this example were:
- Stand up the prone Thrall
- Move a free Thrall next to where the Thrower will Pass from
- Attempt to free the 'BDss' Thrower by Gazing the 'BG' Blocker with the 'B' Blitzer. It's Bloodlust 3+ but there's a Stunned Thrall available if failed, so it can't cause a turnover
- The Gaze fails, so that Thrower is going to have to dodge if he wants to move
- Step the 'W' Thrall forward 1 square, into contact with the Beastmen, to assist the Thrower's blitz
- Dodge and Blitz with the Thrower to clear the south Beastman out the way
- Pass
- Run it in with Runner for the touchdown (off-screen to the left)
Comments
Posted by BeanBelly on 2025-03-22 17:43:41
Nice, I like a bit of tactical analysis. My favorite bit of the 145 Discord Server actually back then
Posted by Jopotzuki on 2025-03-24 23:09:06
It is easy until you roll double 1's for BL